
.jpg) 2 hours ago
2
2 hours ago
2
![]()
With the onset of version Luna II, a new iteration of Spiral Abyss is once again here in Genshin Impact. Floors 11 and 12 feature enemies such as the Wayob Manifestations, Lawachurls, Battle-Scarred Rock Crab, Frostnight Herra, Wilderness Exiles, and the Primo Geovishap. While some of these enemies are pretty easy to tackle, defeating others within the specified time limit requires good team setups that take advantage of the Ley Line disorders and Abyssal Moon buffs.
This article provides a guide on the best teams that you can use to clear Floors 11 and 12 of the Genshin Impact Luna II Spiral Abyss.
Top teams to clear Genshin Impact Luna II Spiral Abyss
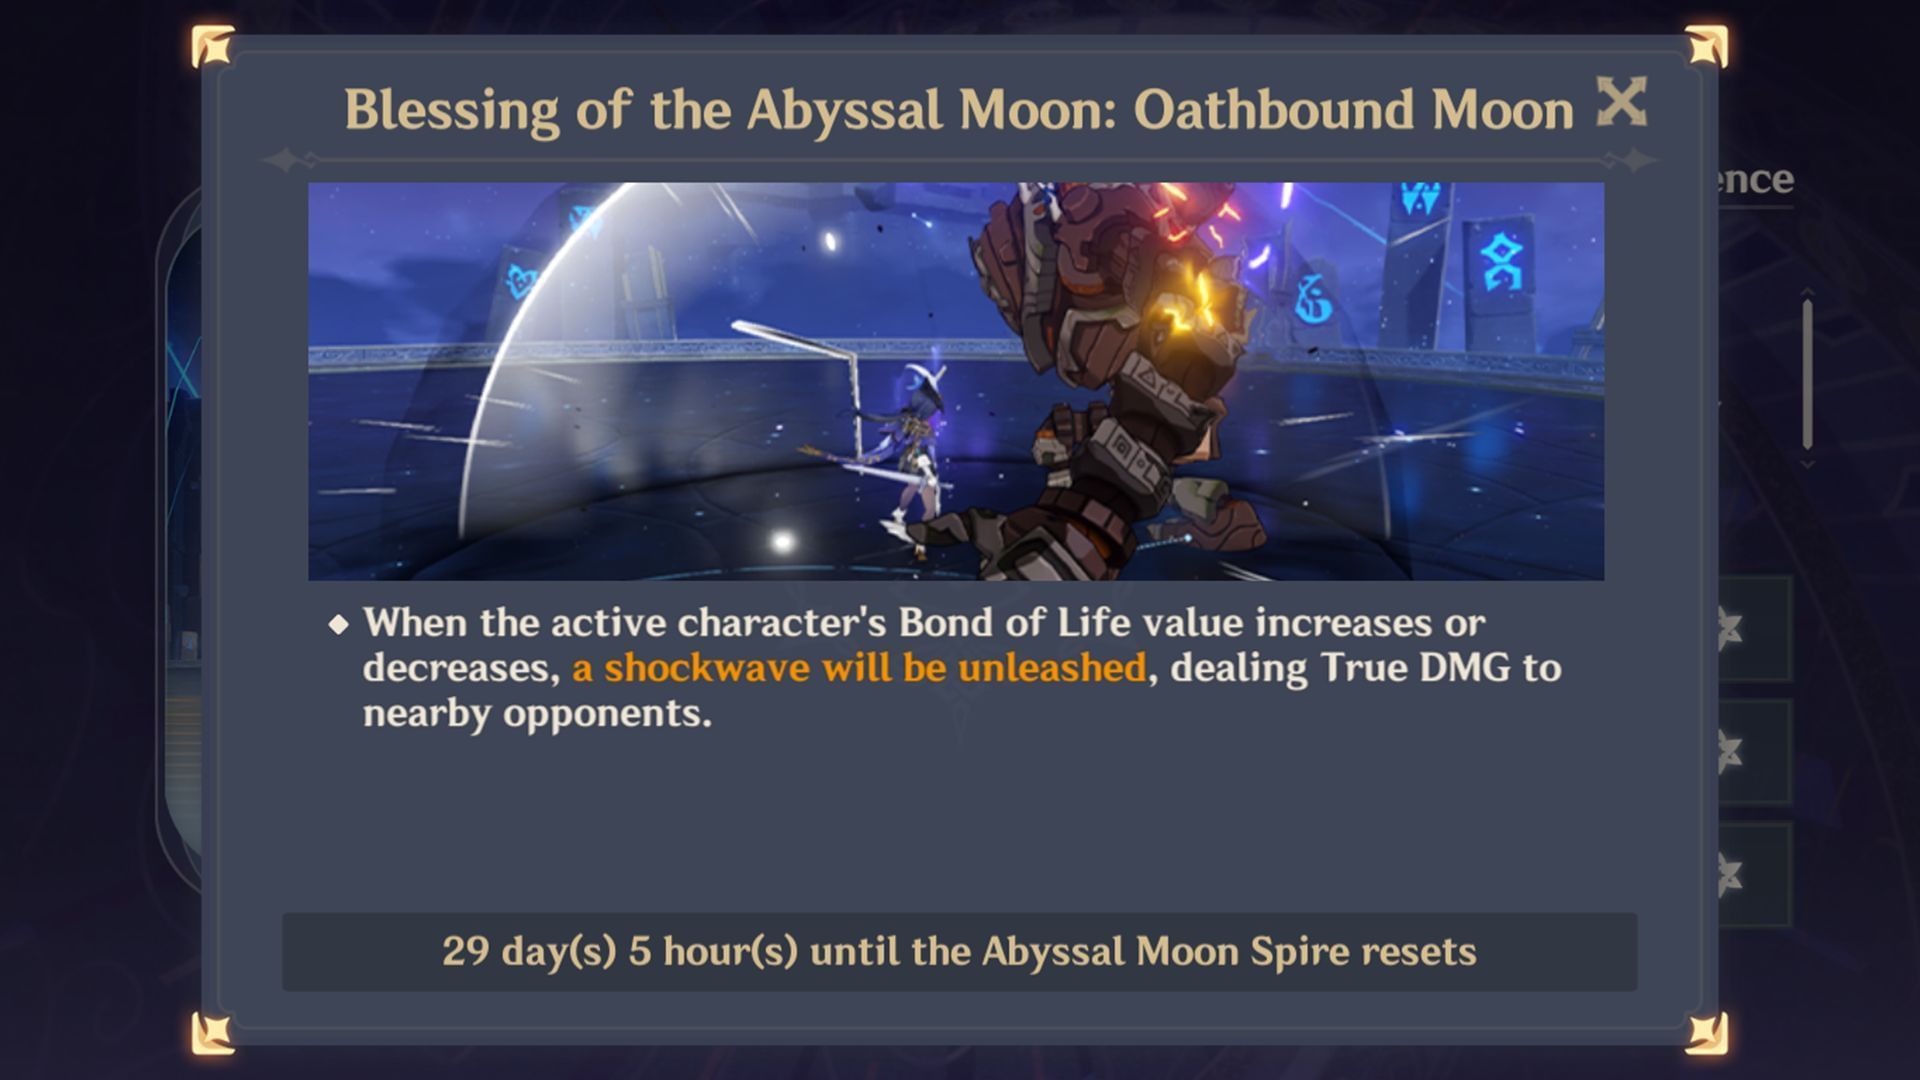 Genshin Impact Luna II Spiral Abyss Abyssal Moon Blessing (Image via Sportskeeda Gaming/HoYoverse)
The Genshin Impact Luna II Spiral Abyss has the following Abyssal Moon Blessing:
When the active character's Bond of Life increases or decreases, a shockwave that deals True DMG to enemies is unleashed.Currently, there are very few characters in game who can utilize Bond of Life mechanics (the only two capable units being Arlecchino and Clorinde). However, it is not mandatory to use these two characters, and players can easily clear Spiral Abyss using other well-built DPS units.
Here are some teams that can be used to challenge the current rotation of Spiral Abyss in Genshin Impact Luna II:
Floor 11
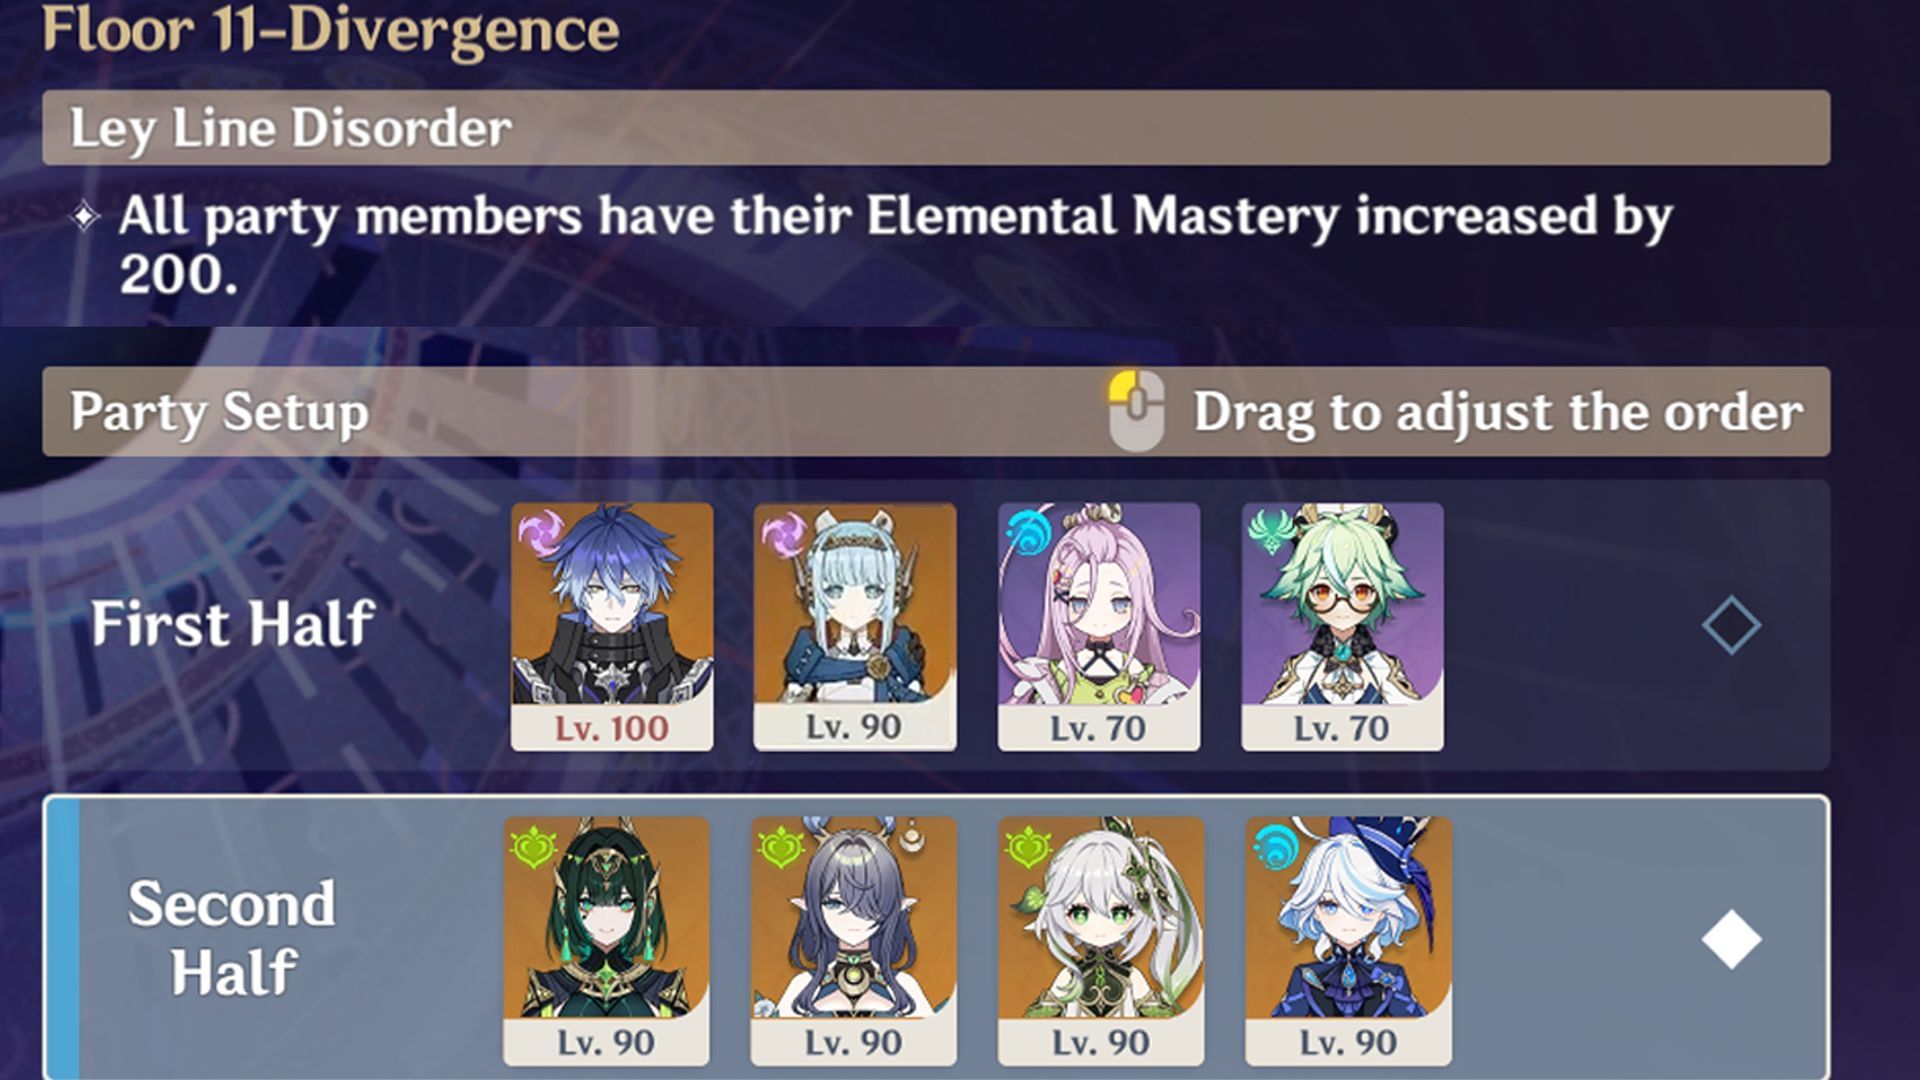 Best teams for Floor 11 of Spiral Abyss (Image via Sportskeeda Gaming/HoYoverse)
Floor 11 has a Ley Line Disorder which grants an Elemental Mastery buff to all characters. Hence, units who can scale off Elemental Mastery (or benefit from it) can be used to clear this floor. Here are some teams that you can pick to challenge the enemies in Floor 11:
First half
- Flins + Ineffa + Aino + Sucrose
- Mavuika + Citlali + Xilonen + Bennett
- Varesa + Furina + Iansan + Xilonen
- Clorinde + Nahida + Fischl + Kazuha
Second half
- Nefer + Lauma + Nahida + Furina
- Lauma + Nilou + Nahida + Xingqiu
- Arlecchino + Zhongli + Emilie + Bennett
- Arlecchino + Zhongli + Yelan + Bennett
Enemies in both halves of Floor 11 can be defeated very quickly by single-target DPS units. While the Frostarm Lawachurl and Stonehide Lawachurl in Chamber 3 have shields that can be taken down swiftly by Pyro and Geo units, bringing them along is not mandatory, especially if you have exceptionally well-built DPS characters can can defeat them without needing to destroy their shields.
Also read: Arlecchino C1 vs R1: Which one should you pull for in Genshin Impact Luna II?
Floor 12
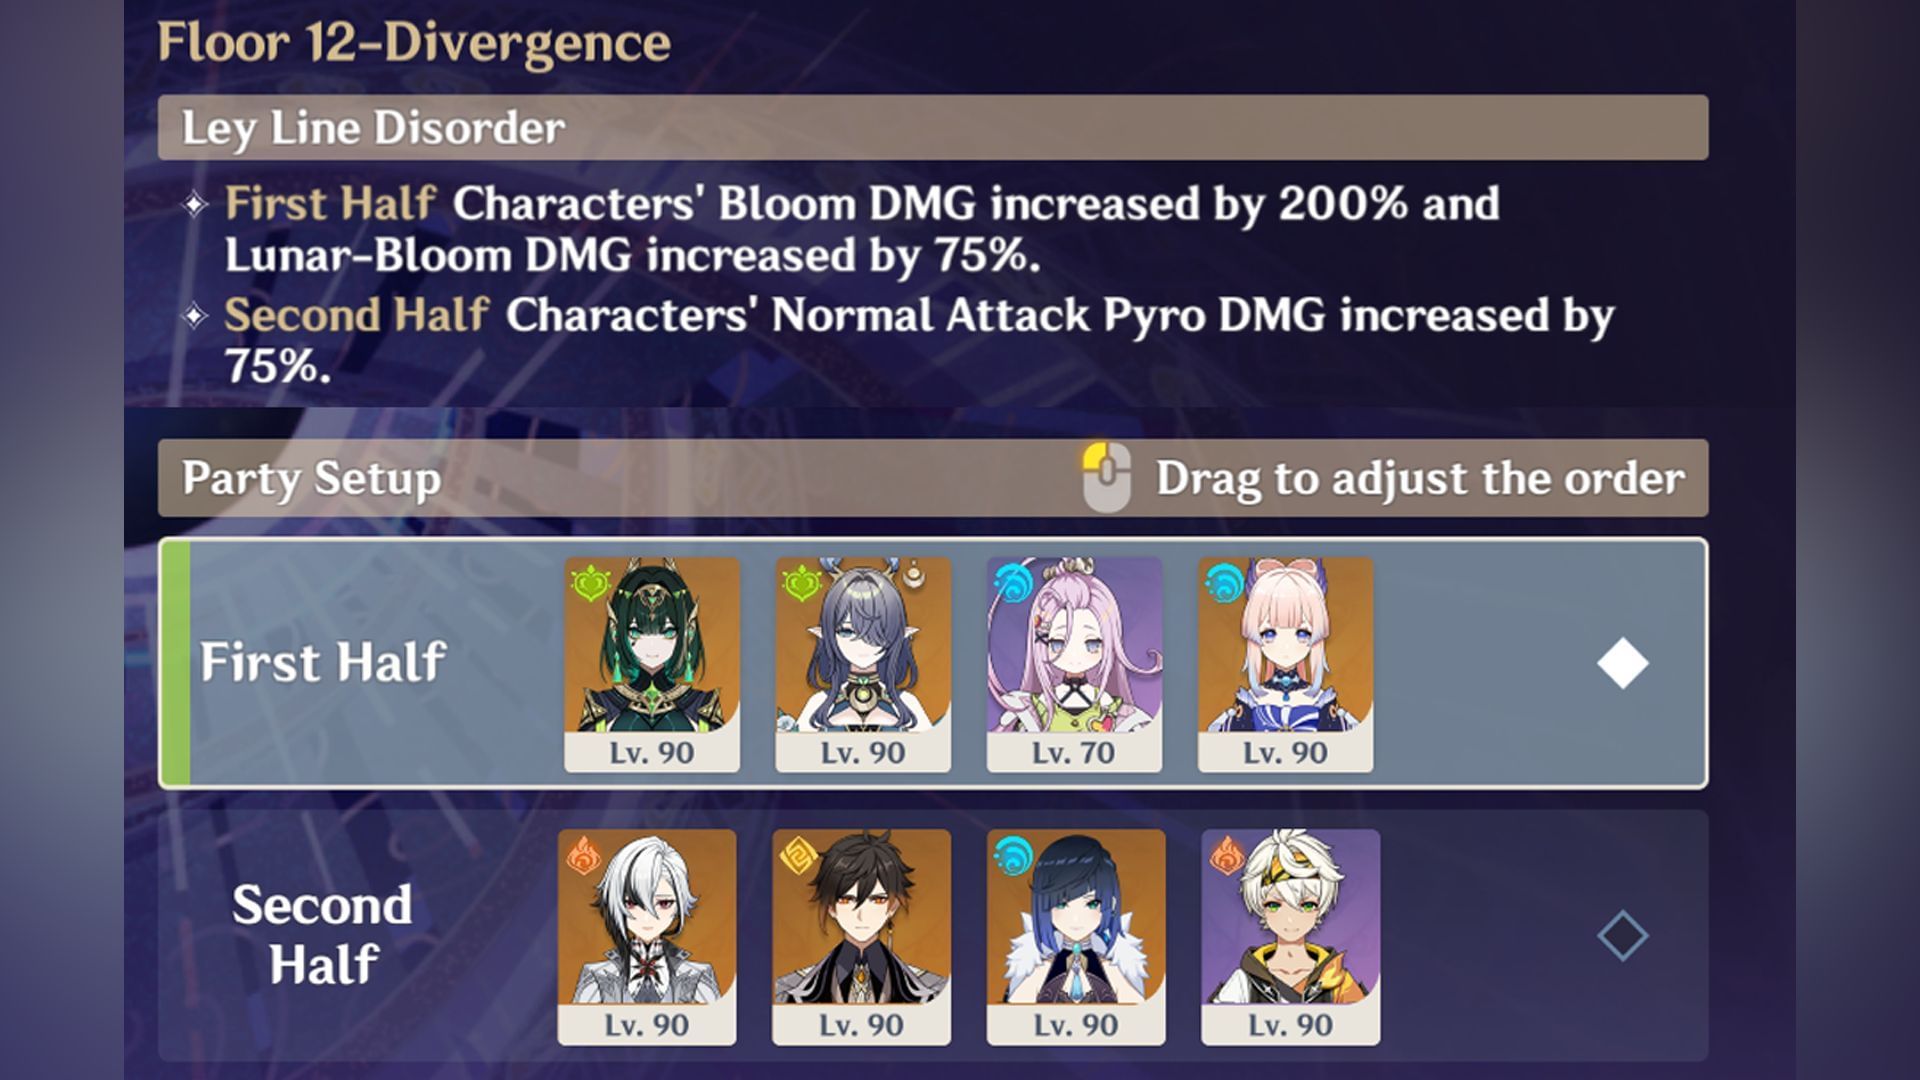 Best teams for Floor 12 of Spiral Abyss (Image via Sportskeeda Gaming/HoYoverse)
Floor 12 of Spiral Abyss features two different Ley Line Disorders, which are the following:
- First half: Bloom DMG dealt by characters is increased by 200%, while Lunar-Bloom DMG is increased by 75%.
- Second half: Normal Attack Pyro DMG dealt by characters is increased by 75%.
As evident from these buffs, the first half of Floor 12 can be best cleared with Dendro-Hydro teams that can deal Bloom and Lunar-Bloom damage, while the second half is exceptionally suited for 5-star Pyro unit Arlecchino, whose main source of damage is her Pyro-infused Normal Attacks. That said, other Pyro units such as Mavuika can also comfortably clear the second half of Floor 12.
Here are some teams you can use for Floor 12 of Genshin Impact Luna II Spiral Abyss:
First half:
- Nefer + Lauma + Aino + Kokomi
- Neuvillette + Furina + Nahida + Kuki Shinobu
- Nahida + Yelan + Xingqiu + Kuki Shinobu
- Nefer + Lauma + Nahida + Furina
- Flins + Ineffa + Nahida + Aino
Second half:
- Arlecchino + Zhongli + Yelan + Bennett
- Arlecchino + Zhongli + Emilie + Bennett
- Arlecchino + Chevreuse + Fischl + Bennett
- Mavuika + Citlali + Xilonen + Bennett
- Skirk + Escoffier + Furina + Shenhe
The first half of Floor 12 features the Battle-Scarred Rock Crab in Chamber 1, making a Bloom/Lunar-Bloom team mandatory for this half. Focus on applying Dendro to the Stoneborne Seeds spawned by the boss in order to stun it and bring it down to the ground. While fighting the Frostnight Herra boss in Chamber 2, make sure to try and trigger Lunar reactions while its Fury bar is charging (when it is in its Gloomveiled state), so as to render it Element-less once its stunned.
The second half of Floor 12 has no specific Elemental requirements, and can be easily cleared using single-target DPS units. It is recommended to bring along a shielder if you are using Arlecchino as your main DPS, in order to maximize her damage output without having to worry about getting staggered while performing her Normal Attack strings.
Also read: Genshin Impact Imaginarium Theater November 2025: Enemies, buffs, and best characters
Follow Sportskeeda for more Genshin Impact news, updates and guides.
Why did you not like this content?
- Clickbait / Misleading
- Factually Incorrect
- Hateful or Abusive
- Baseless Opinion
- Too Many Ads
- Other
Was this article helpful?
Thank You for feedback
Are you stuck on today's Wordle? Our Wordle Solver will help you find the answer.
Edited by Aishwarya Ghosh
 English (US)