
.jpg) 2 hours ago
2
2 hours ago
2

Ever wanted a slice of the cosmos at home? You can buy genuine meteorite as a keepsake for home. But did you know you can unveil incredible detail that you can't see with the naked eye, too? All it takes is knowing what to look for and what you need to make a successful observation.
I'll take you through the process of identifying and studying a genuine meteorite sample from the comfort of your own home and make personal recommendations for gear that I've found useful for the best results. Want to observe right away? See our step-by-step TL;DR below.
TLDR how to observe a meteorite using a microscope
- Choose the right microscope for the job: A dome loupe or hand lens works well on location, or a stereo microscope is a good option for slice samples and 3D views.
- Light your meteorite from above: The meteorite's opaqueness will stop any light from transmitting through it.
- Different colored stage plates may offer different views: Depending on the color of the stage plate you're using, you will get different views of the texture and colors of your meteorite.
- Check the fusion crust for authenticity: This should be abraded and melted from friction and high temperatures, so it will look softer and more irregular than the inner surface.
- Check if it's magnetic: Meteorites are magnetic, so test for authenticity with a magnet.
- Areas of observation: The fusion crust offers many noticeable observations, such as texture, colors and patterns.
- Top tips for observing meteorites: Research your meteorite first to understand what you might be able to observe and check the sample size matches your microscope.
1. Choosing the right microscope to observe meteorites
If you have access to high-tech laboratory equipment, you would use a microtome to slice extremely thin sections of your meteorite to mount on a slide. However, there are plenty of ways your specimens can be magnified at home so you can investigate the beautiful patterns, colors and textures that make up these interesting space rocks.
Article continues below
For a large meteorite, a dome loupe or hand lens can give you a magnified view of the outer surface. Both are portable, so they can be used on location. However, they are limited to 5x to 10x magnification.
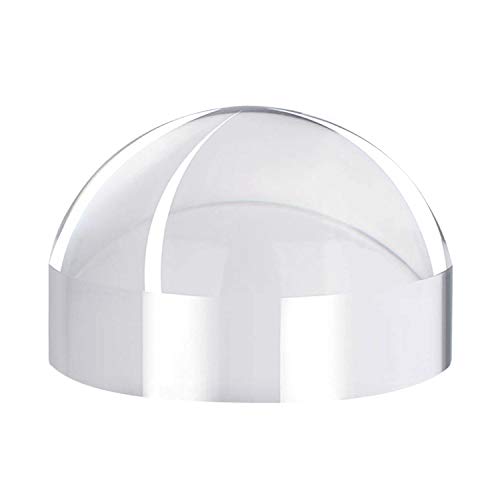
This portable, inexpensive and power-free 40x optical grade dome magnifier is just about as magnified as you want to get before switching to a microscope.
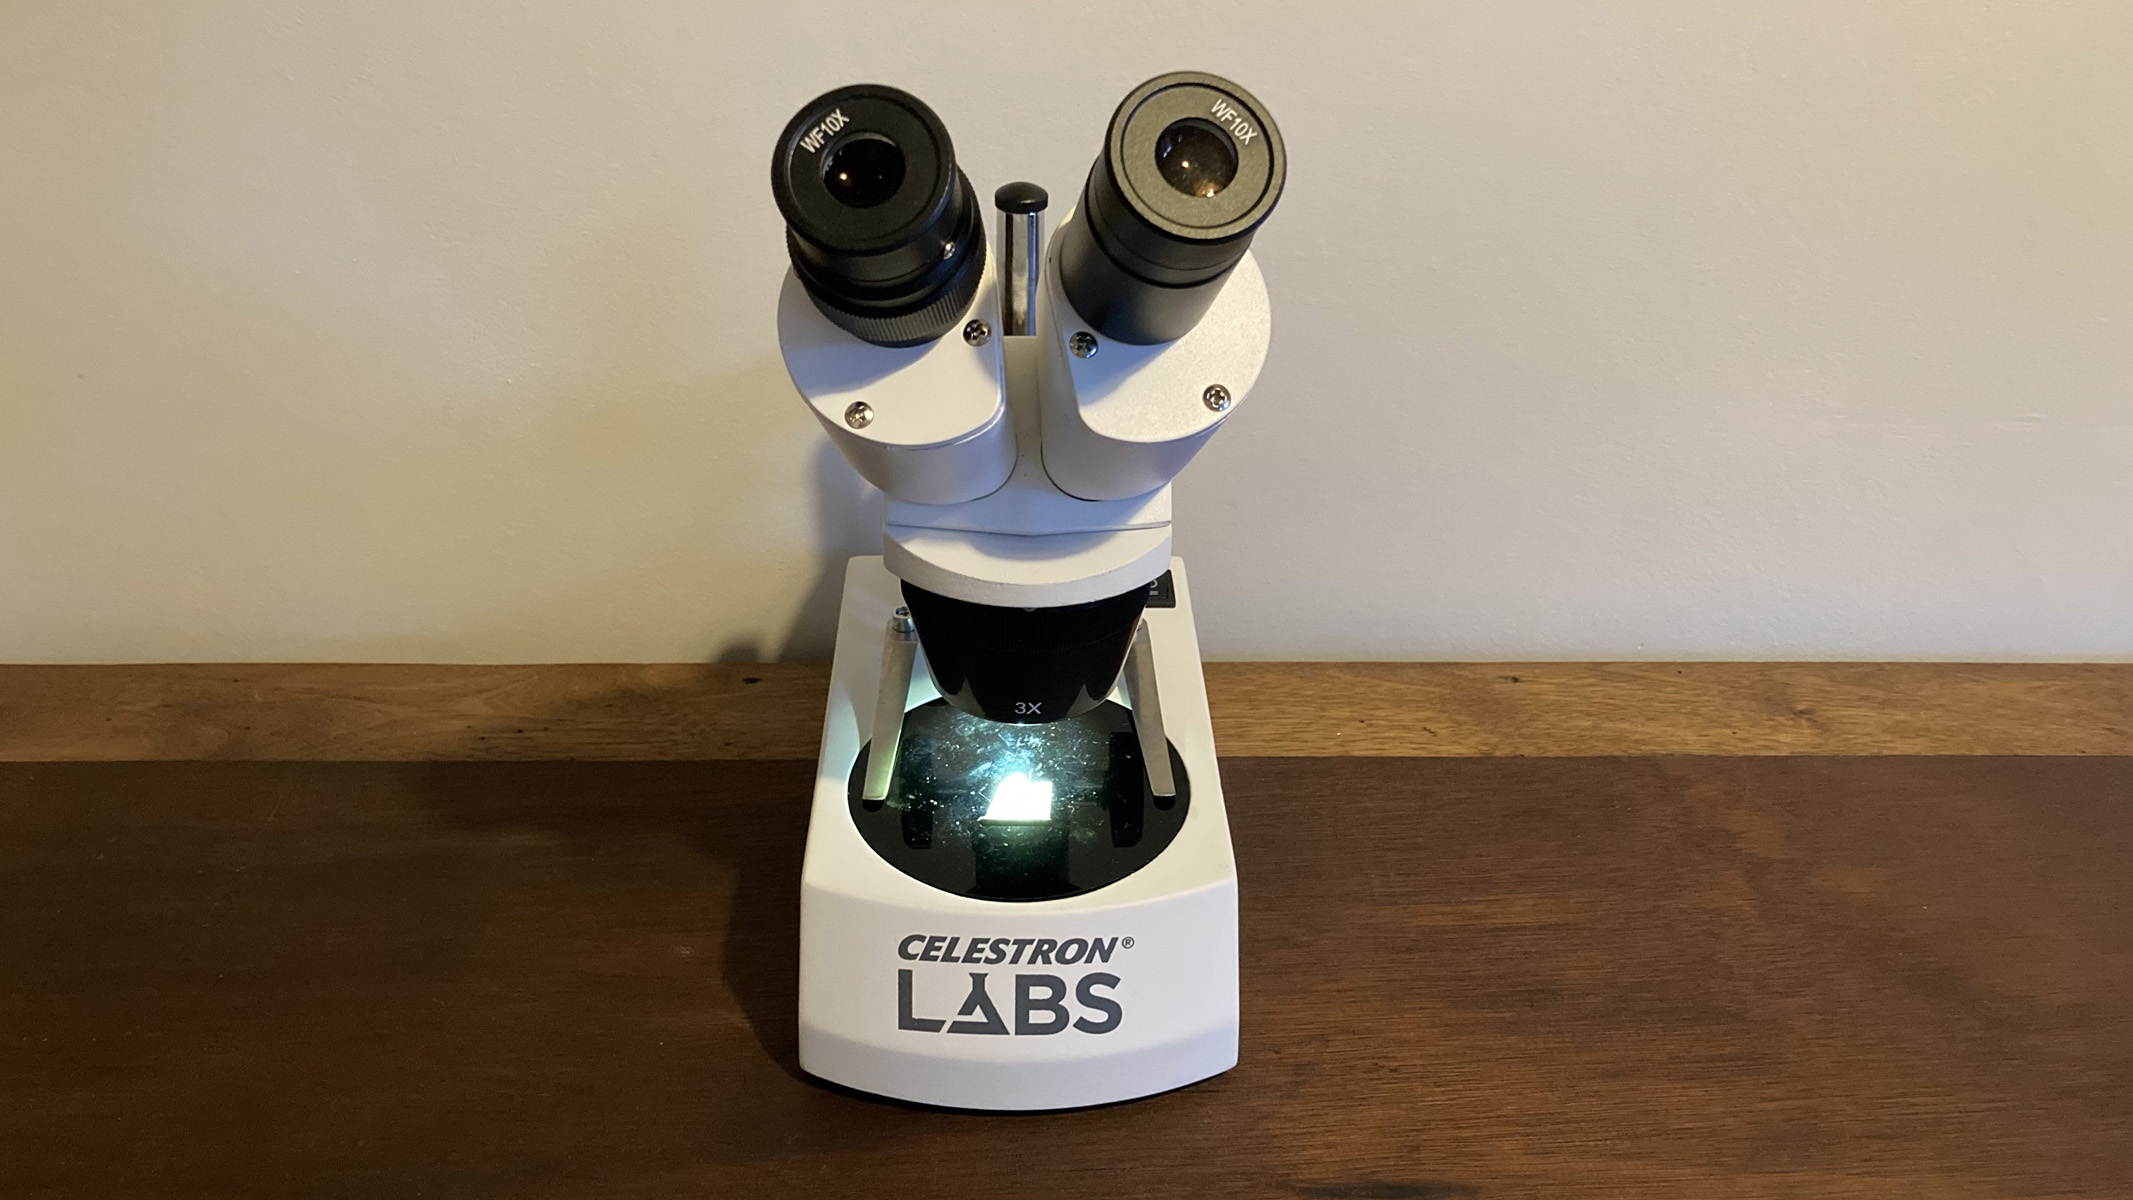
To observe more details, you must obtain a thin-slice sample that fits on a microscope stage. A stereo microscope can provide a three-dimensional image, which is useful for seeing textures, especially on the meteorite's raw edge, the fusion crust. It is also important to illuminate your specimen from above, because the meteorite will be opaque and thus block any light transmission through the specimen.

We used the Celestron Labs S10-60 stereo microscope because it has both features. It also has interchangeable stage plates — black, white and translucent — to enable optimal contrast. This microscope had low magnification, and although this provided a wide field of view, it limited the amount of detail we could see.
Then, we switched to the Swift SW380T, a compound microscope that has high-quality lenses and offers much higher magnification and XY stage navigation. Unfortunately, the SW380T does not have a top light. However, we used a spotlight to illuminate the meteorite from above and successfully observed the specimen at 250x magnification.
2. Setting up your microscope
- Use a working distance of 2.1-inches (54 mm), depending on your sample size
- Light from above using the upper LED
- Swap between the black and white plate under the sample, depending on the feature you want to observe
Setting up the Celestron Labs S10-60 stereo microscope was simple. With a working distance of 2.1-inches (54 mm), it was easily capable of accommodating our 0.04-inch (1 mm) specimen lying flat. We could even use Blue Tack to mount the meteorite upright and observe the fusion crust at a height of 0.6-inch (16 mm).
Illumination needs to be set to come from the upper LED so that light is reflected from above the specimen; it is not possible to transmit light through the opaque matter. We found that the black plate highlighted shiny features and the rusty protuberances on the fusion edge, while the white plate enhanced the darker gray edges. With the 10x eyepiece lenses and the 3x objective lens, the overall magnification of 30x gave a wide field of view and enabled good magnification of a large portion of the specimen.

Setting up the SW380T took a little more work. A small spotlight directed from the side was angled to reflect from the specimen. The 4x and 10x objective lenses were suitable for viewing with this setup. When we switched to a higher magnification, the objective lenses were too long to allow the light to reach the meteorite and reflect through the body tube. To increase the magnification from 100x to 250x, we exchanged the eyepiece lenses from 10x to 25x, which worked well. Unlike the Celestron Labs stereo microscope, the SW380T does not give 3D images. Therefore, you must continually focus up and down to achieve focus at the depths of the thick specimen.
3. How to tell if it's a genuine meteorite
If you're questioning the authenticity of your meteorite, the first thing to look for is the fusion crust. The outer layer of a genuine meteorite would have been abraded and melted when it experienced friction and high temperatures entering the atmosphere. Therefore, in a real meteorite, this outer layer will appear visibly softer and more irregular than the inside structure.
Most meteorites are highly dense and magnetic, so test them with a magnet. Density can be measured by dividing mass by volume. An iron meteorite should have a density of between 7 and 8 grams per cubic centimeter.
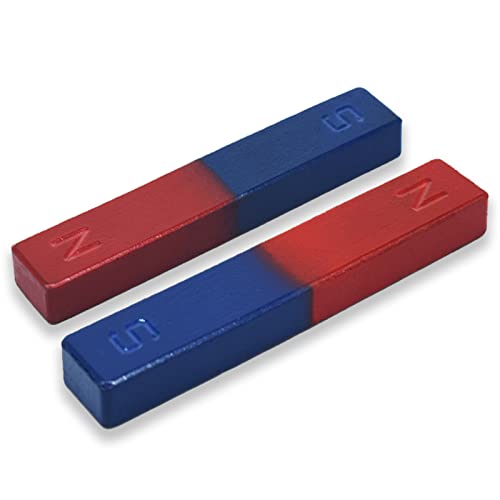
Use a bar magnet (or any magnet you have around the house) to test if your meteorite is genuine. If it is, it will be attracted to the magnet. We recommend not using a strong neodymium magnet though, as they are strong and it could damage or break the sample when attaching or removing.
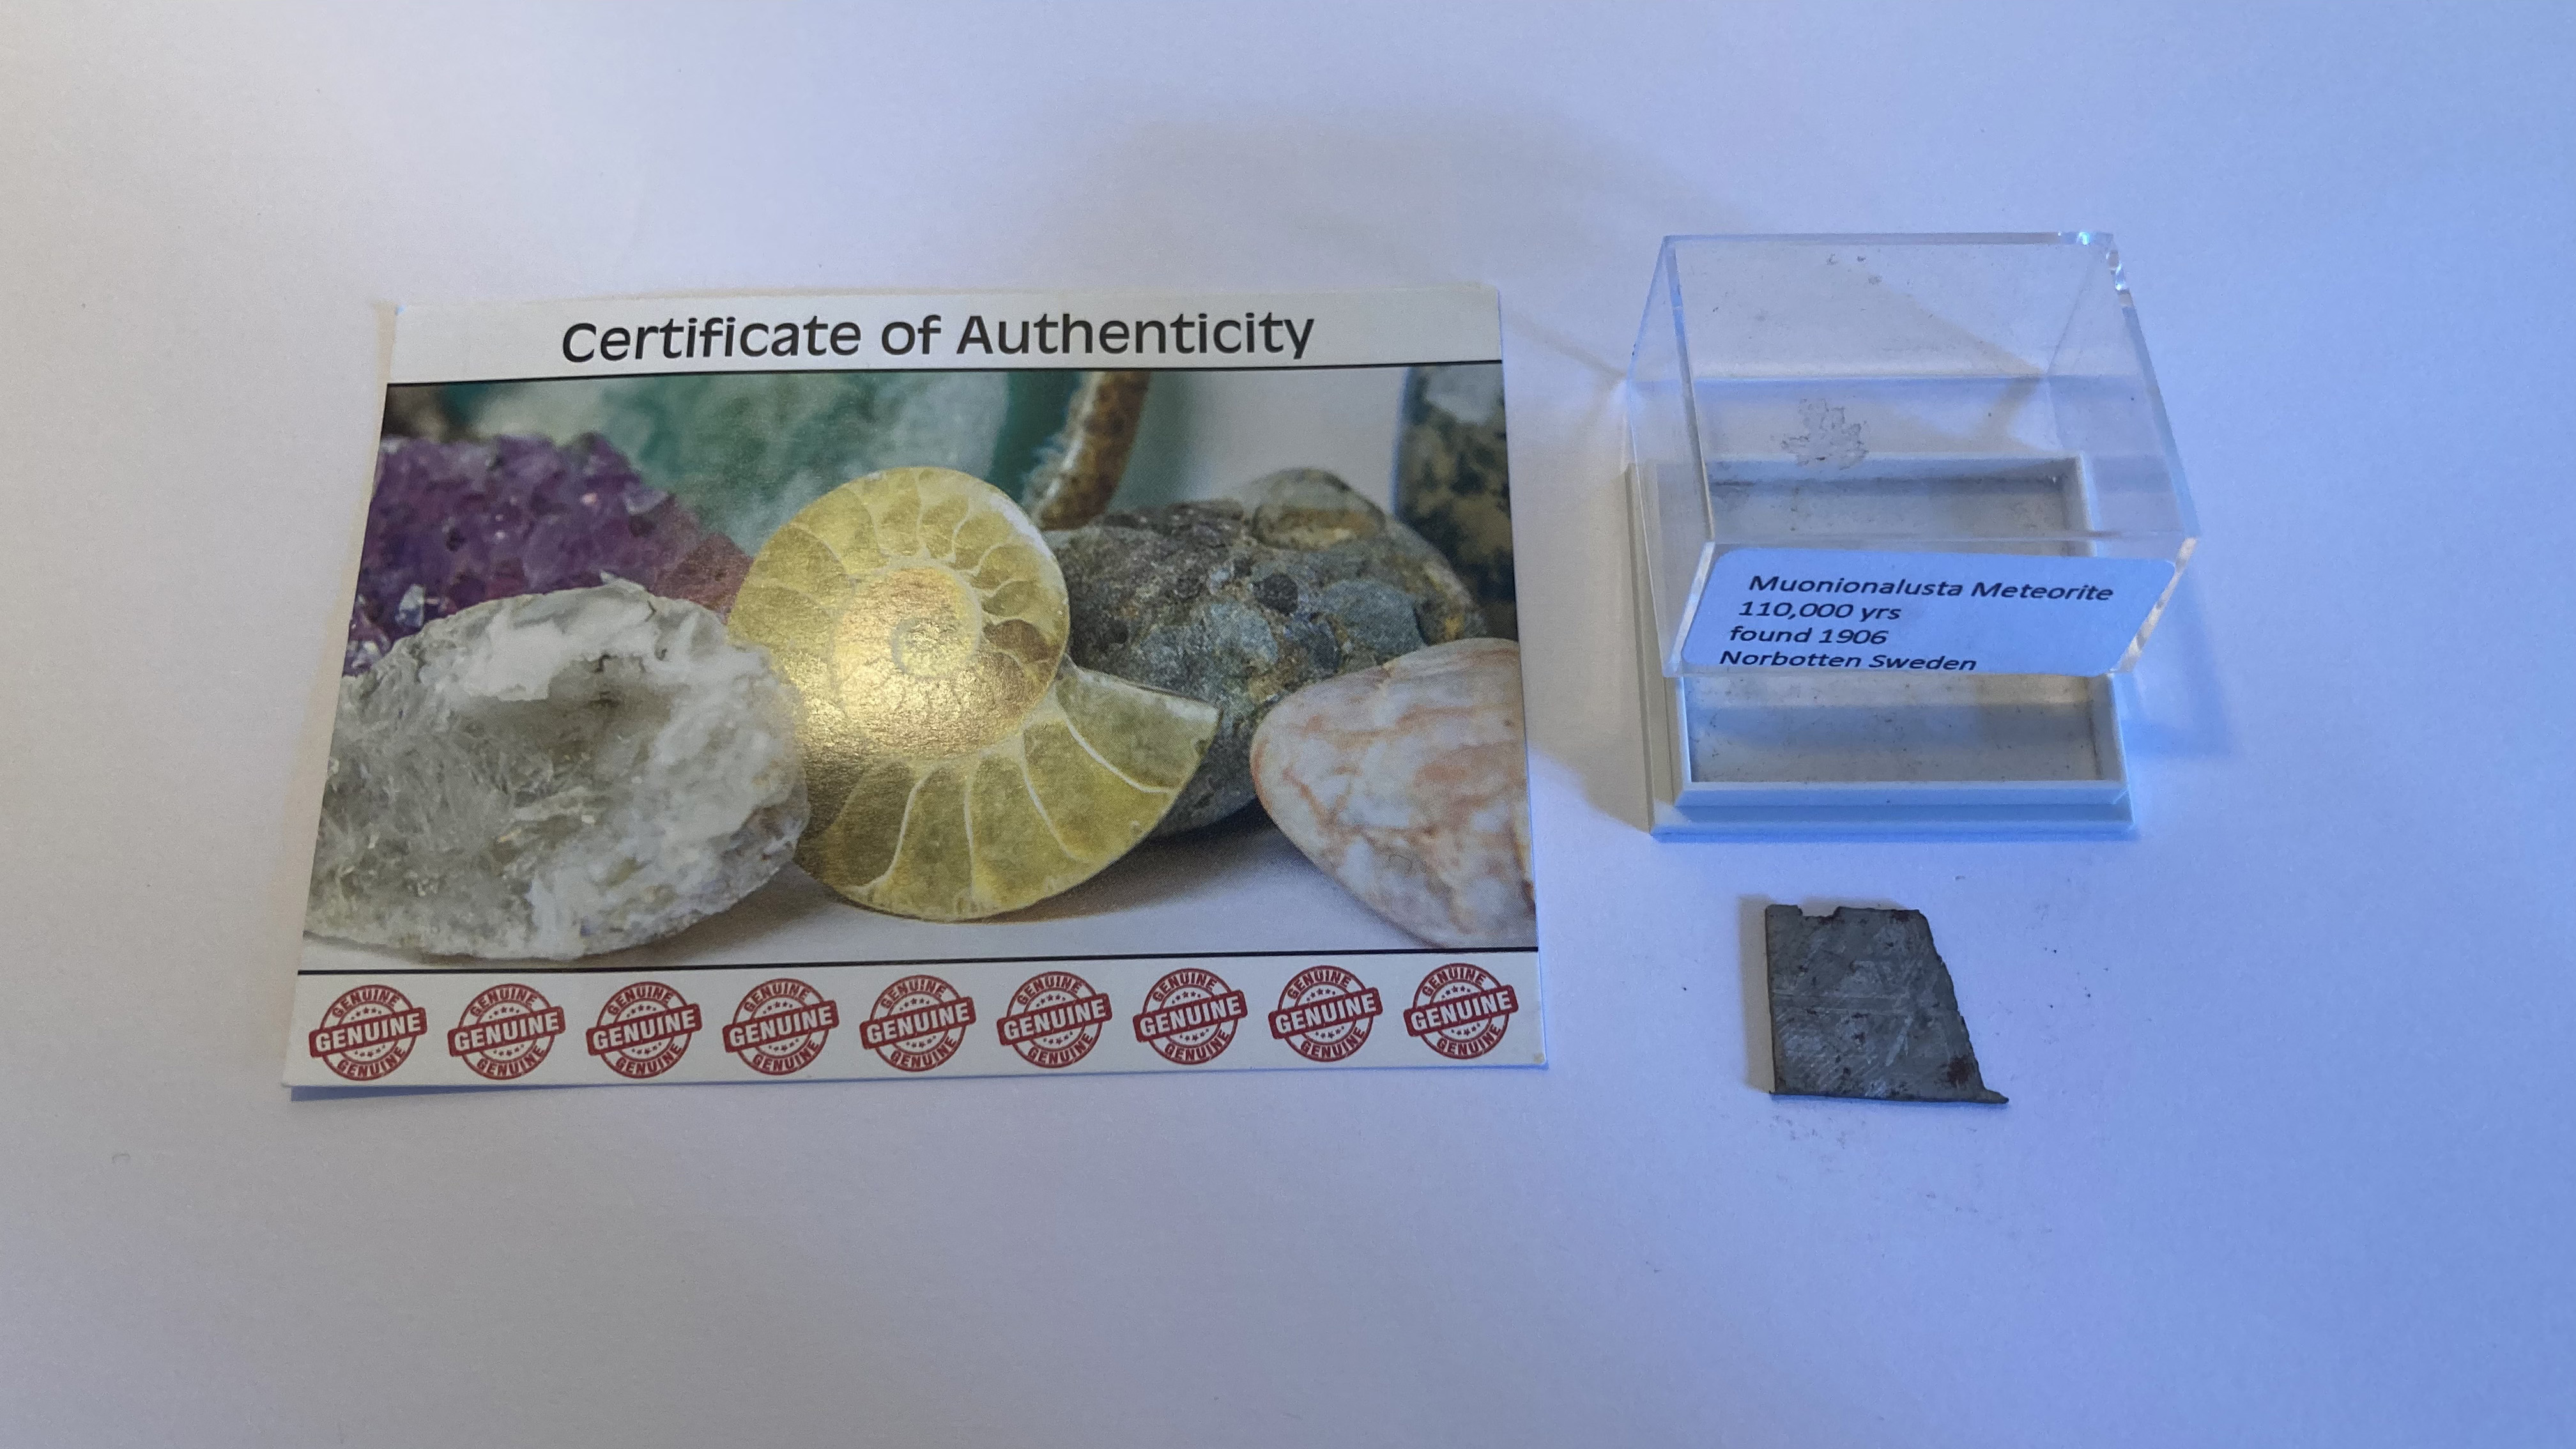
Our meteorite came from a reputable supplier with a certificate of authenticity. Meteorite finds will not have this, however, so look for the above features or seek advice from an expert. As a starting point for procuring samples, you may want to consider Aerolite Meteorites, which are members of the International Meteorite Collectors' Association (IMCA).
4. Look for notable observations

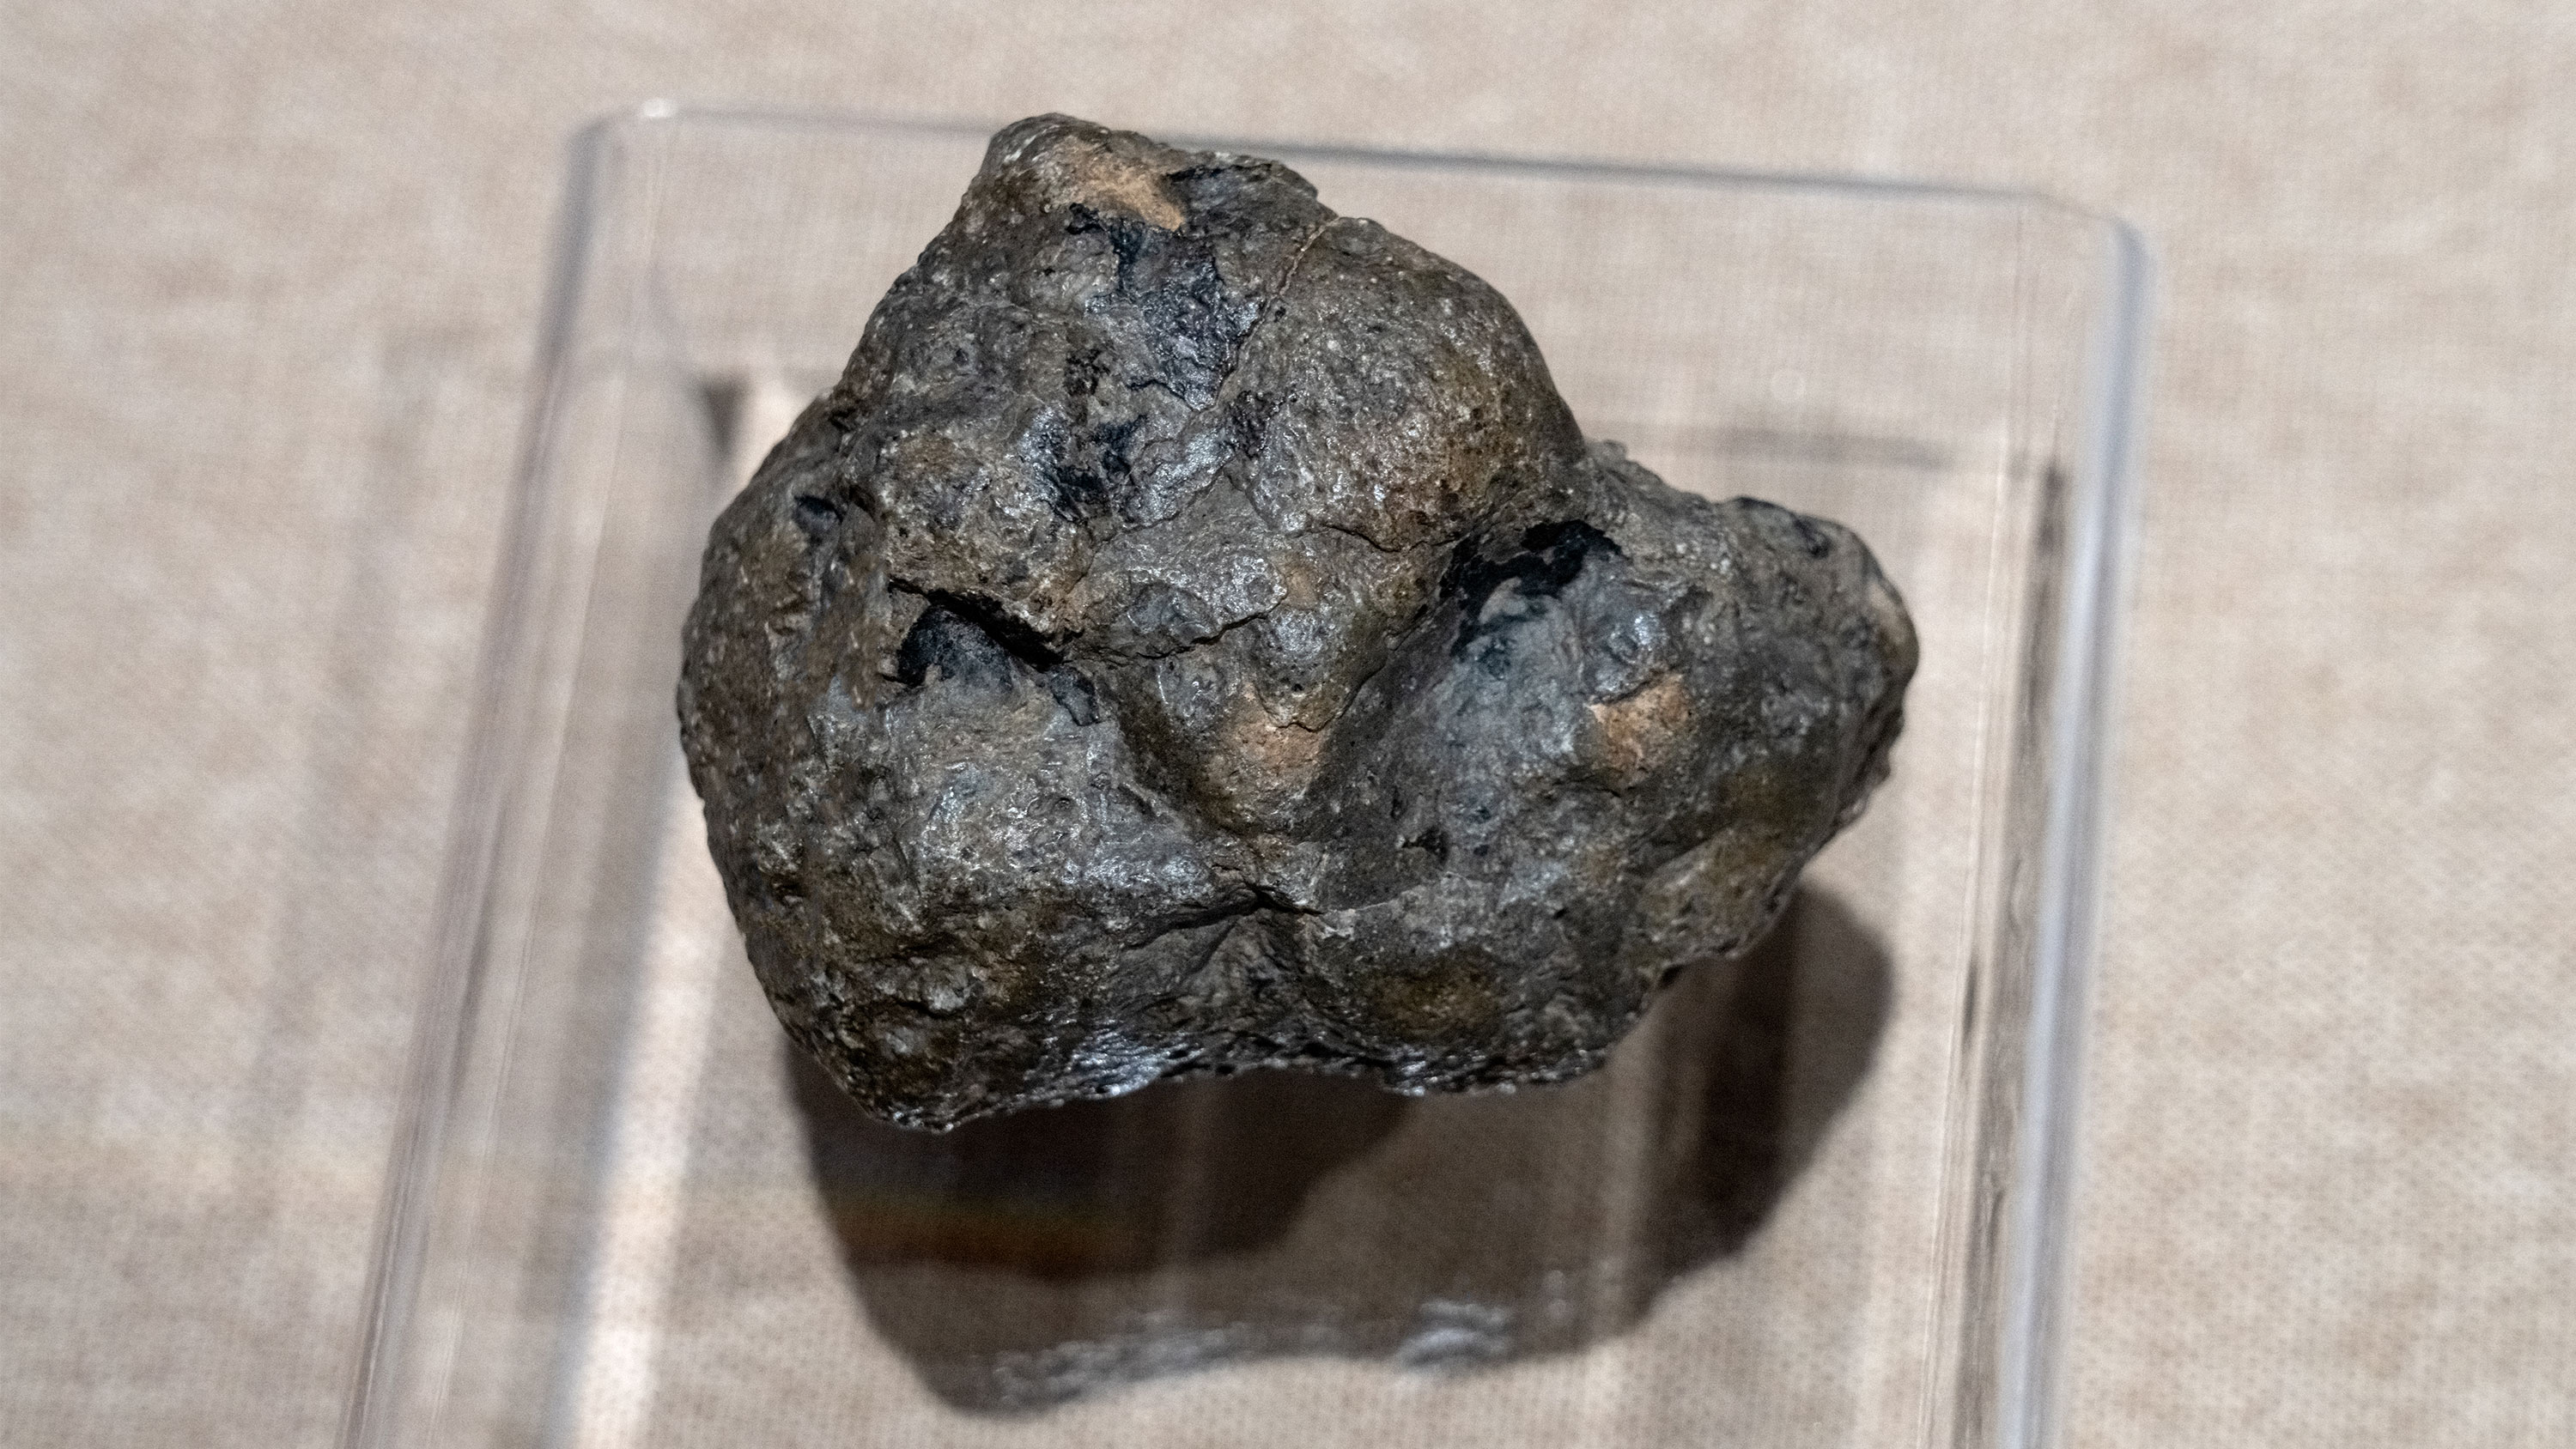
With the naked eye, our Muonionalusta meteorite fragment had a silver color and a textured, partially shiny, cut face. It also proved to be magnetic. When observed under the dome loupe, one edge had a more pitted appearance, which was dull and darker in color. This appeared to be the fusion crust.
At 30x magnification, patches of rust were visible, in contrast to the silver metallic matter that formed the majority of the sample. The fusion crust was more irregular than the cut edges.

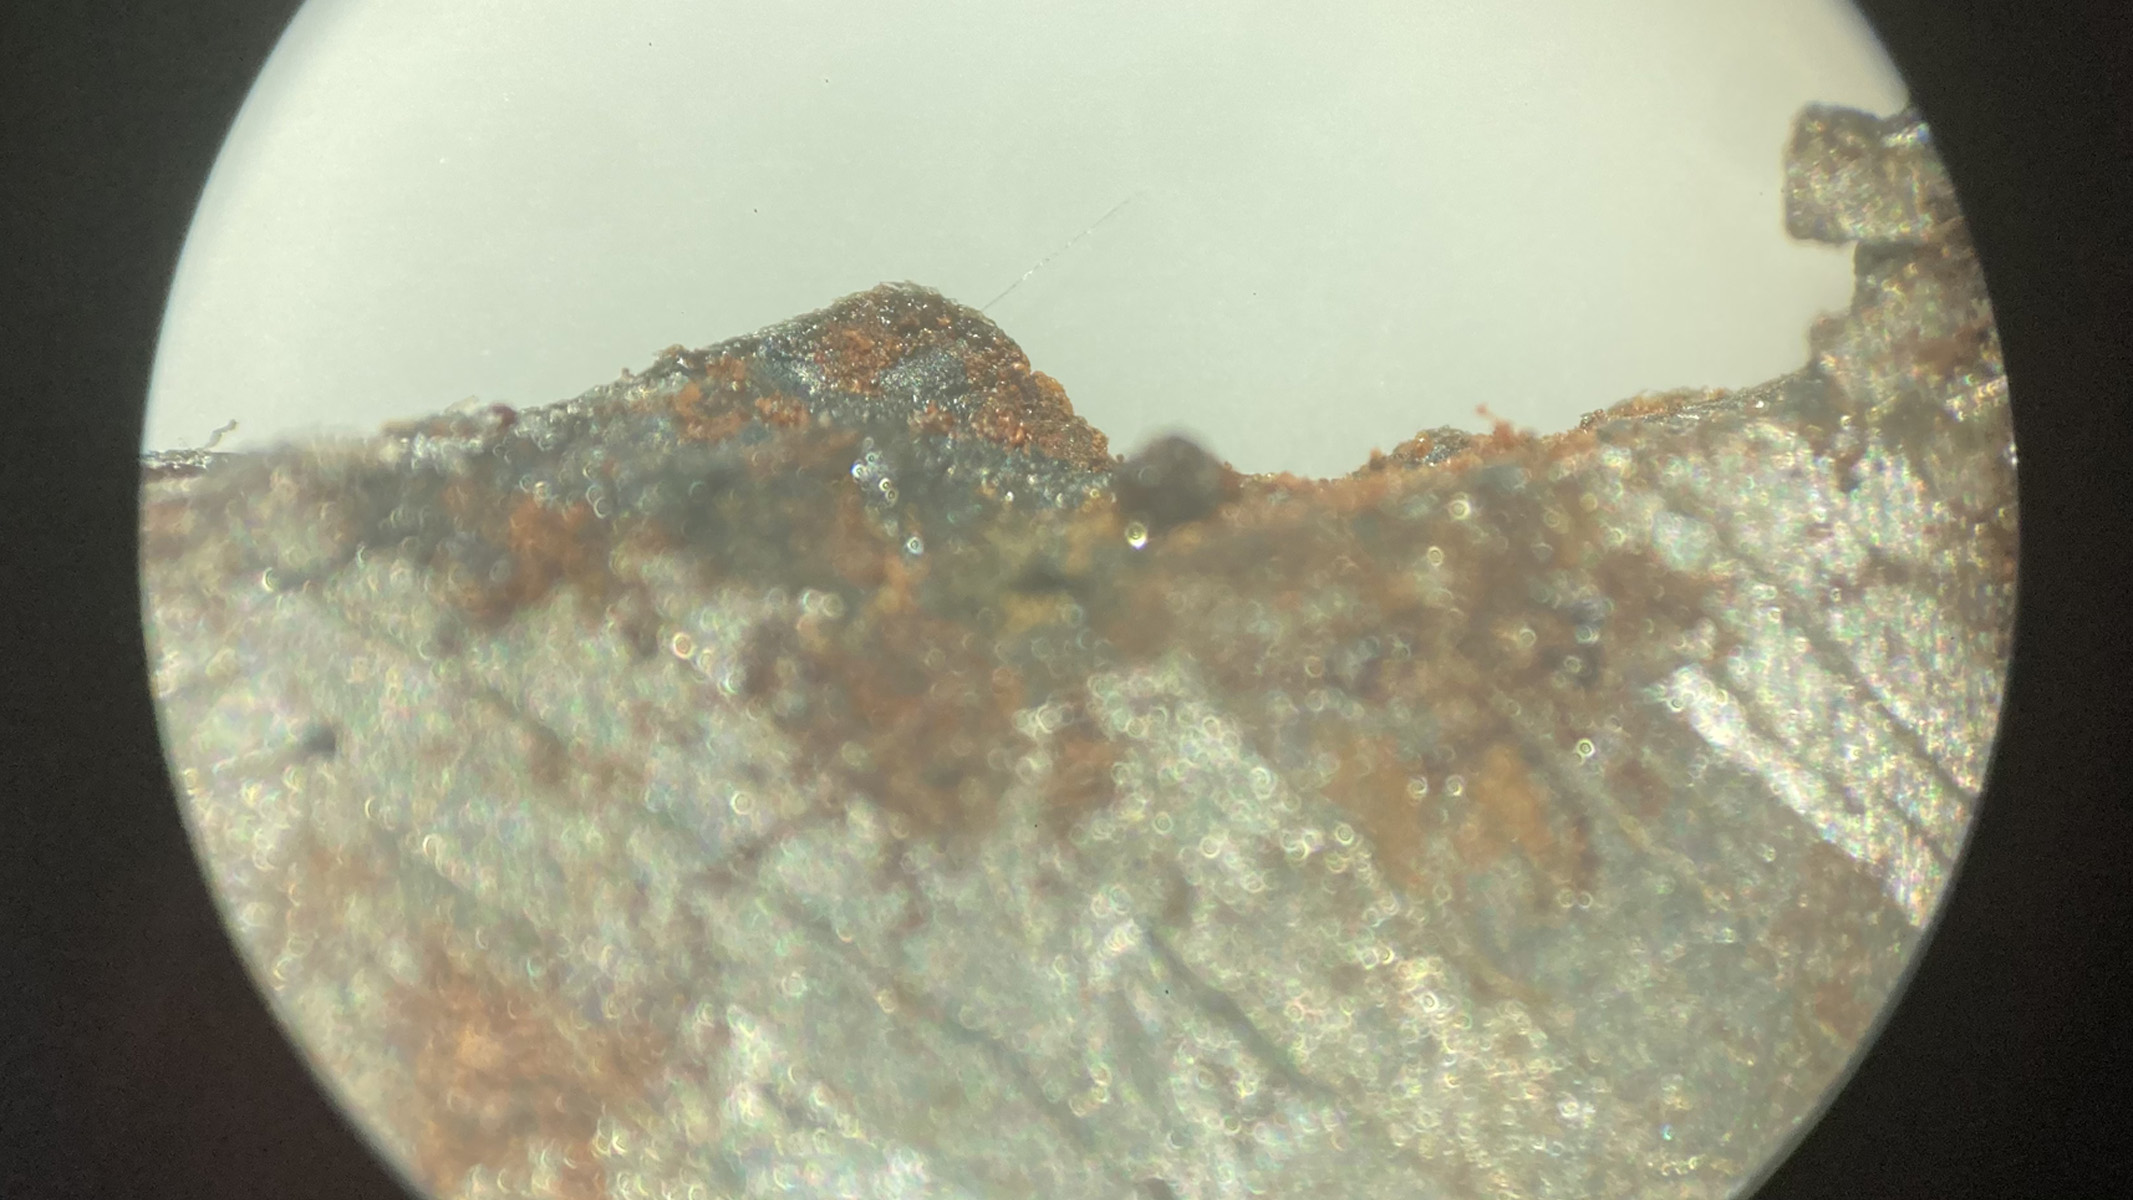
At 100x magnification, the fusion crust had visible bumps in a variety of shapes and colors. But, because Muonionalusta is unstable, it is susceptible to rusting. The orange surface matter could well have developed in more recent years as the iron-based meteorite has reacted with oxygen to form iron oxide. We could see several gray, rounded surface bulges, as well as some clear strands. At 100x magnification, the Widmanstätten pattern was clear.
The fusion crust nodules became more defined at 250x magnification. A beautiful fissure revealed a pitted texture on the shiny gray material, probably an iron-nickel alloy, with spherical rust growths emerging. A more regularly shaped crystal on the meteorite's surface could have been stishovite, a silicon dioxide compound formed under high pressure. Although it's rare on Earth, stishovite is a tetragonal crystal known to be present in the Muonionalusta meteorite.
5. Other useful tips and tricks for observing meteorites
Research your meteorite before you start your observations so you know what you may find. Is your meteorite iron, stony or stony-iron? Should it have chondrules (round grains found in stony meteorites)? Will it have regmaglypts (thumbprint dimples on the surface)?
Make sure you have the right sized sample for your microscope. A compound microscope needs a very thin slither — a few micrometers — or it must be illuminated from above. For specimens of a few centimeters, a stereo microscope is suitable.
Try searching for your own micrometeorites by collecting particulates from roofs or drain spouts. Use a magnet to see if any particles are attracted, and discard nonmagnetic ones. Use your microscope to identify any rounded, shiny ones — perhaps with a pitted surface — or signs of a melted outer surface. If so, you may have found a micrometeorite.
What is a meteorite?
A meteorite is a piece of inorganic space matter that has entered our planet’s atmosphere and landed on Earth. Meteorite samples give scientists an insight into how our solar system has evolved, help to map out the history of our universe and make predictions about future events. On a personal level, we get the opportunity to observe materials and patterns that are otherwise unavailable on Earth. You may be used to viewing the night sky through one of the best telescopes or best binoculars, but enjoying the view of a meteorite through a microscope takes you much closer to the wonders of the universe.
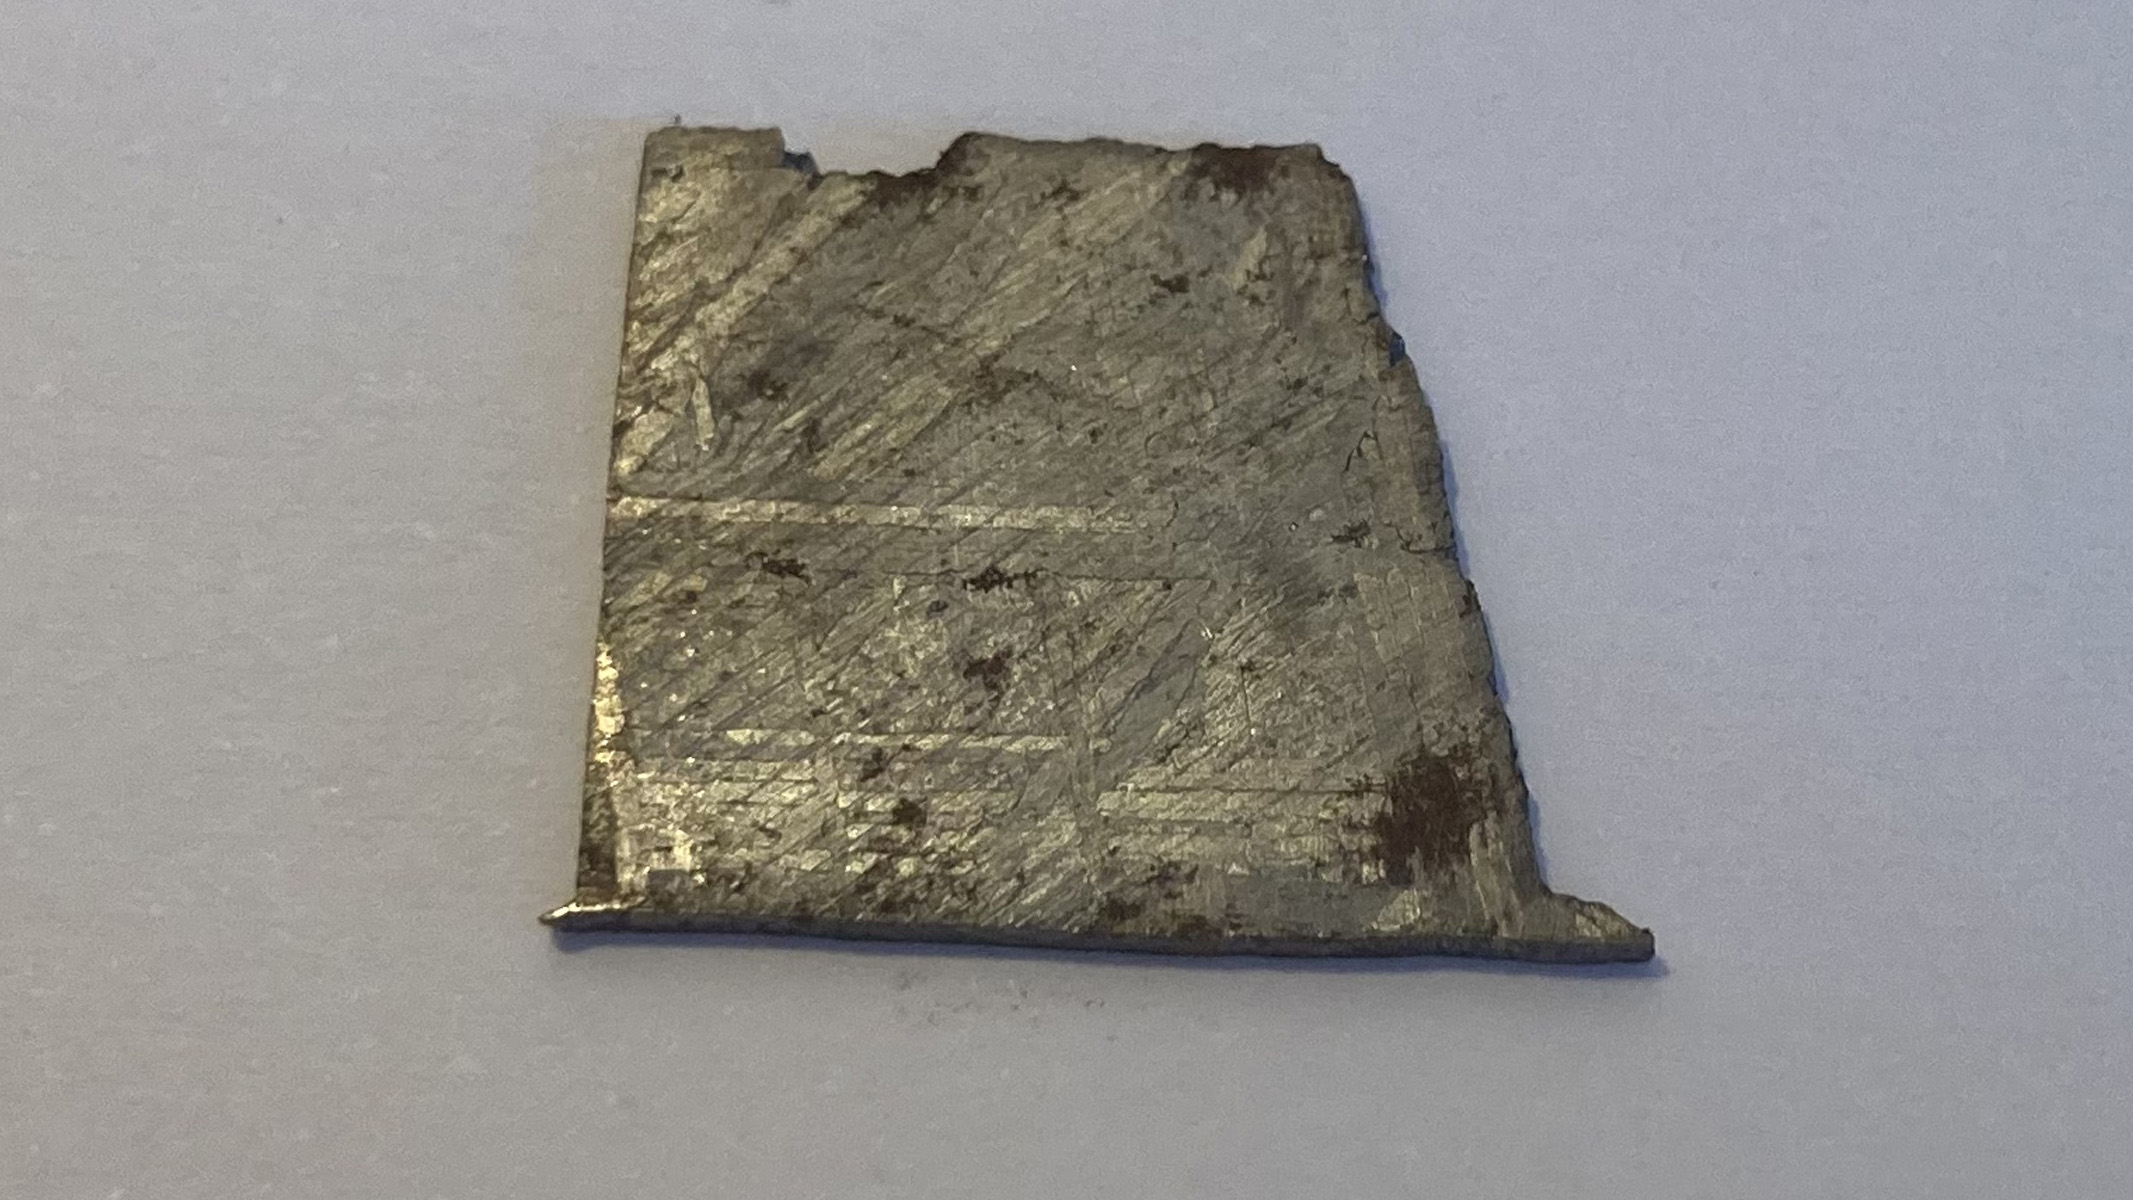
To identify good microscope features and enable finer observations of meteorites, we used an authentic slice of the Muonionalusta meteorite. Our sample was found in Norrbotten, Sweden, in 1906. You can find out more about how to tell if you've found a genuine meteorite in our How to tell if it's a genuine meteorite section.
Muonionalusta is an iron meteorite with iron-nickel alloys and traces of gallium, germanium and iridium, and its body displays the striking Widmanstätten pattern. Our sample had a raw edge that displayed the fusion crust, which formed when the outer surface melted as the meteorite entered Earth's atmosphere. Small stishovite crystals were present.
We chose a low-magnification stereo microscope with a top light because the opaque meteorite would have blocked the transmission of a lower-light source and condenser, and because it provided three-dimensional images. Although a number of high-magnification microscopes include a top light, we chose to adapt a simple light microscope to illustrate how you could observe a meteorite at home, no matter what type of microscope you have.
 English (US)